Friday, October 30, 2015

The Forth Punch Cup of Christmas for the Funkie Junkie Challenge


I am really enjoying these cups! Altering them has been so much fun! This one was originally white until I sprayed the edge gold.

This tag of Linda's was a little hard for me because I didn't have any plaid! That flower & those pine cones are really rock stars and I wanted to at least pull in the colors and velvet texture of the flower.


Since I was using red, white, and green I used a little green Stayzon ink to  highlight all the details on the actual cup!


I really love those fuzzy flocked branches! They are vintage! Those pinecones I picked up while camping and I've been holding onto them for Christmas projects. 


I'm really enjoying adding these rusty keys and the snowflakes too! 

Take a peek at Linda's Shop, The Funkie Junkie! Her store is hosting the challenge and the items she carries are top notch!


Wednesday, October 28, 2015

The Third Punch Cup of Christmas for the Funkie Junkie Challenge


Linda's third tag had me stumped a little. Red is always a hard color for me but I got creative and painted my snowflake red. Hers had a bit of a copper color to it, so I used one of my clear cups and frosted it first. Then I hit it up with some copper spray paint. I really liked making the little snow scene in the last cup to decided to cut out some deer out of craft paper.


I used Be Merry as a spin off on Merry Christmas on a little metal piece I had. Can you see it hiding behind the deer?


Hope you get a chance to stop by Linda's Shop, The Funkie Junkie! Her store is hosting the challenge and I cannot wait to go on a nice long shopping spree! Thanks for the lovely tag to inspire us, Linda!

Happy Wednesday!

Tuesday, October 27, 2015

The Second Punch Cup of Christmas for the Funkie Junkie Challenge


Linda's Tag #2 was DELICIOUS! I loved black and gold...and those trees! Totally ran away with those colors and decided I needed to create a small little scene & cut some trees out with my Silly. Found out that hot glue makes really sweet snow when you sprinkle on a little glitter!


I used "Hope" on my tag with a sparkly dove to symbolize the star that Linda used! Really digging the little words!

Hope you get a chance to stop by Linda's Shop, The Funkie Junkie! Her store is hosting the challenge and I can honestly say I am always inspired by the very unusual items as well as these lovely tags!

Happy Tuesday!


Monday, October 26, 2015

Me on a Monday, Pumpkin Doughnuts & Crunch Underfoot


A quick shout out to Sian who is the Me on Monday girl! Waving at her from way over here in New York where we are currently knee deep in leaves!

It was a most excellent Friday weather wise so we ripped off the garage roof after work. Slowly but surely we are turning our garage into a work shop. First it was new siding and now it's the roof. Friday evening we got a bunch of the new steel on and wrapped up the rest of it on Saturday. Good thing 'cause it rained on Saturday evening and was wet and damp on Sunday.


THE MAN has a ridge cap yet to install & some cross buck doors. And then there are those lovely lockers he has been hoarding that need to go somewhere. Can't wait to see what he does with those!

Hopefully next weekend we'll have some nice weather to tackle the leaves! They are pretty but need to be composted before the snow flies...which is sooner than we think. I am enjoying the colorful hills and the crunch underfoot. Not to mention the cinnamon sugar pumpkin donuts from Wegmans! I have switched up the projects to Christmas though...wait until you see the second, third, and forth punch cups for the Funkie Junkie 12 Tags Challenge I have for you this week!

Hope your weekend was crazy productive!

Friday, October 23, 2015

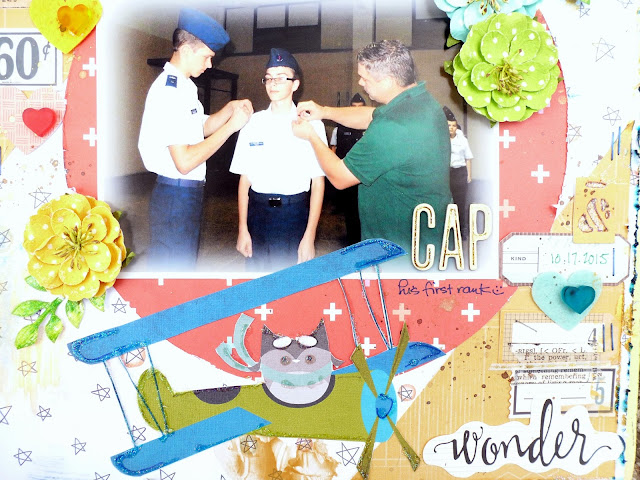
CAP Layout & TGIF!


I had second thoughts about putting a pretty little owl & plane graphic with flowers on a Civil Air Patrol layout, but then I decided that I was making the page for me and that I like pretty...so on they went! The glitter glue didn't require much thought after that...what is there not to like about glitter?


Luke had his first ranking ceremony for CAP and in fact, it was the first time he wore his dress uniform! He said he kept telling himself to not lock his knees...and he must have been nervous as he was sweating under his hat! However I thought he looked awesome and handsome!


I had been planning on printing that plane graphic on white paper and using it as background, but instead I printed and fussy cut it. It just about killed me...I probably could have figured out how to cut it on my Silly, but that seemed like cheating...anyhow that owl is super cute! It's from a digital download called Aviator Owls by Collective Creation!


And one last photo of some flowers and cool leaves..love cutting leaves out of scrap paper and inking them up...add some glitter glue, they are delish!

Happy Friday!

Wednesday, October 21, 2015

Much Planning Ahead for Shoe Wrangling


The next project after the garage gets buttoned up & after the green lockers get installed, is my shoe rack. I have been DREAMING (and pinteresting) about a nice place to keep all the shoes at bay since we moved to this house.

The last house had a rather nice built in piece we had installed in the closet so good shoe storage & also the closet door shut so you didn't have to see how many pairs we had (a lot). But alas it was "installed" so we left it for the new owner.

When I found this monstrosity at the ReStore for $40 I was somewhat pleased. It's that whole fake wood thing so THE MAN was quite snubbish of the whole thing. My theory was what difference does it make if you are painting it black...


I am trying to think of a good way to work in these vintage hardware pieces. I am also inspired by a piece my Dad has been hoarding in his barn for a while that my great grandpa made...Might make a nice topper....


THE MAN has been less than enthusiastic about all this but like he says...WHEN exactly have I not helped you meaning that he might groan a bit...but he's on board...

Haven't quite worked out how it will all go together, but somehow the shoe rack also needs feet...I have a few weeks to wait though! We have to install the second half of the roof still....hoping for good weather next weekend!

Wish us luck!

Tuesday, October 20, 2015

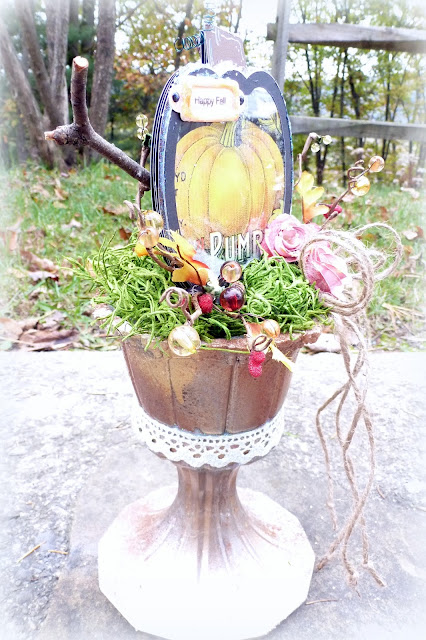
Pumpkin Shaker Card Candle Stick for THE CUTTING CAFE


Oh dear Fall...you have left leaves allllll over outside! When we get a weekend where it's not also snowing, we'll put some effort forth to get them cleaned up! Can you see them sneaking in my photo??


I had to also bring in the pumpkins so they wouldn't freeze. That is what is so lovely about paper pumpkins! My little decoration here is fuss free and will be just as pretty next fall too! And what is there not to love about glitter & rolled roses!

Believe it or not, these two base pieces were hanging out at the second hand store in the glass section but were not together. One was a candle stick and the other was a glass pot. I glued the two together and spray painted them with gold, silver, and copper to get that mottled look. Then I built a card board top for the pot and hot glued on that greenery & my paper pumpkin. 

The paper pumpkin was so much fun to build! It's one of the shaker cards in the Halloween & Fall Shaker Card set over at THE CUTTING CAFE. As it is designed to be a card, it was easy to use the extra layers I cut to really bulk up the pumpkin. I also cut out a really cool pumpkin label that I got from THE GRAPHIC FAIRY to use under the clear shaker part. 


I actually own an original label that looks just like this one that I used on my shelf in my office because lots of these vintage labels are still floating around Westernville, which is where my Mom still goes to church and is near where I grew up. Cool, huh! However, you can also print your own! 

A huge thanks to Regina for this awesome cutting file that allowed me to create a cool decoration that I'll really enjoy this fall & beyond. Love projects like that! 

Happy Tuesday!


Monday, October 19, 2015

The Twelve Punch Cups of Christmas for the Funkie Junkie Challenge


I do believe this is my forth year participating in the 12 Tags of Christmas over at the Funkie Junkie. Oh goodness. I have I been blogging that long? Years past I have created snow flake icicles, decorated the top of Herb Ox containers, and once altered a sample box. This year I decided to upcycle punch cups!

Got the idea while strolling around the second hand store. They have a huge tub of punch cups there marked for .25 cents a piece. Which is good since two never made it to the photo and I must have twelve...guess I'll just have to suffer & take another trip...they are just hauling out their Christmas stuff and you never know what vintage goodies you might unearth...


I figured I'd decorate the inside of the cups yet keep some kind of theme going with keys, snowflakes, and a phrase. That way they are all very unique just like the lovely tags that Linda gives us for inspiration yet have something tying them all together.

Speaking of her tag...


She has given us this delight in gold & red to base our first "tag" on. I of course nabbed the word bright, the poinsetta, and a little bit of the gold for inspiration!


I also tied my own tag on the handle of the cup & attached a key. I have a little collection of rusty metal keys that I am really looking forward to using those on these cups!

Speaking of cups, I may or may not use them as is! This one was altered using vinegar, gold spray paint, and mirror paint to give it a vintage mercury glass look. They might look good frosted, or even plain!


You might be able to see the mercury glass look a smidge better in this view looking down on the cup!

Well, two more tags have been posted, so I had better get cracking! Glass pun intended!

Take a stroll through Linda's Shop, The Funkie Junkie! Her store is hosting the challenge and I can honestly say I am always inspired by the very unusual items! I especially like the metal pieces...after all my "tags" are completed, I plan a nice little shopping trip there and stock up with all kinds of goodies!

Happy Monday!

Thursday, October 15, 2015

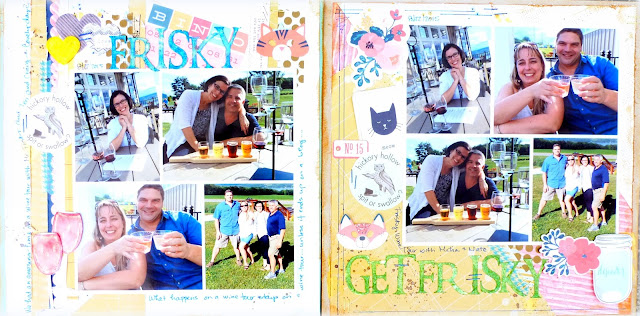
What Happens on the Wine Tour Stays on the Wine Tour....unless you are a blogger


Randomly the weekend after we had lost the dog, I had scheduled a wine tour with a friend. Teri was super excited to get out of the house and I thought THE MAN and I needed to buck up...so away we went.


Mr. Les Frisky (the wine tour owner and yes that is his real name) turned out to be really good at off color jokes and picking hole in the wall wineries that I had never visited. WE HAD A BLAST. I promised myself that the next wine tour would result in photos of the actual winery so I could remember where I had gone...and perhaps even the bottle of wine in front of said winery? Would help with the wine brain that results in a few too many samples...

Regardless, we came home with lots of bottles and some good memories of a really great time! It also took our mind off things thankfully for the day.


I cut out some letters on my Silly as I had to spell out Get Frisky & Frisky twice because I made Teri a page. You might also spot a sticker I copied from one winery that says Hickory Hollow spit or swallow as that is of course what you might do with a wine sampling..but we all had a good laugh over it!


I shrunk down the Wine Glass Card that Regina sells over at The Cutting Cafe to make those two little glasses. They make me happy! Not quite as happy as a real glass of wine, but pretty close!


You might spot some beer in the photos too! We hit a couple breweries as well. A great time had by all! I can't wait to go on our next tour early November!

Happy Thursday!

Wednesday, October 14, 2015

Wee Upcycled Christmas House


I finally got this house squared away. I have had the pieces of it hanging out in my office for ages. I wasn't sure exactly if I was going with a Halloween theme or Christmas...


Here is what I started with & my original post on this piece. I used plaster to fill in the big country stars. I also added a clear (frosted with spray paint) glass plate to hold the fake snow. And even though the base was already gold, I used gold spray paint to soften it just a bit. The glass & metal upcycled candle stick are held together with epoxy.


I used a lot of gold, glitter glue, and some ink to get this house properly grunged up. Plus I added some fancy prima resins & a decorative metal piece in the front to help cover those stars up more..


I hot glued a couple of little trees behind the house to make it look realistic. Love them!


Currently I am talking myself out of adding vintage lace around the bottom of the plate...who knows. There is plenty of time before snow flies...

Happy Hump Day!

Tuesday, October 13, 2015

Happy 15th Birthday Lexi


This page was particularly difficult to photograph....probably because the gold map paper was clear and shiny...but I kept at it and finally got a photo I liked...

Good thing 'cause I wanted to take a few minutes and wish my baby girl a Happy 15th Birthday!


It's a super cute photo of Lexi and Duncan. It was his first night at the house and she had just gotten home from her volunteer work at the Corning Museum of Glass and was eating her supper. My point with the page is that it is pretty common for her to be eating and watching YouTube....so I figured I'd capture the moment!


Just tucked in a few flowers and fall leaves to decorate & of course a "15" on the side!

I am sure she'll have a terrific day...she is off to get a new fish tank with her Dad after school & we have plans for dinner at Olive Garden (her choice!).

Happy Tuesday!

Monday, October 12, 2015

Gram Skip Hankie Quilt & altered quilt hanger


I've been teasing about this quilt for some time! Unlike a scrap page that is a few hour project, a quilt requires a much large commitment! Not to mention all those butterfly antennas that needed to be hand embroidered.

I picked it up the other day from Cricket's Crafts and then was lucky enough to get some time in the middle of the day to visit my Gram in her nursing home. We "think" she confirmed that these hankies had belonged to her Mom. 


I thought that hanging the quilt next to her plates that I blogged about last week was fitting.  And below a photo of her & Grandpa. 


The quilt hanger is a pressure hanger. It was quite the find for $8 down at the Corning ReStore

I could have ordered one for $80 that was hardwood, but I was having trouble with that concept as I knew I'd either want to paint it black or white. So it was awesome to find one that just needed some sanding and some spray paint. 


Good thing I have three very handy dandy spray painting stumps...was just what I needed!


That little corner makes me so happy now! Super pretty!

Hope your Monday is awesome!

Thursday, October 8, 2015

Vintage Dowery Key & Peacock Feather Beach Canvas for LESSology


This was so much fun to create! We missed our friend's wedding in the Outerbanks and I really wanted to make something for our friends! Such a lovely photo! Our beach challenge over at LESSology worked just perfectly!


I started off with a white canvas and a can of chalky white spray paint in lieu of gesso. Then grabbed some plaster and masks to create some background texture. After the plaster dried, I sanded it just a little to get off the rough edges.


You can just see the plaster circle peeking out behind the photo below. I inked up the plaster after it was dry and then used glitter glue to make the texture shimmer. Love that huge dowry key that I found at an antique store. I even kept the price tag and slipped it under the key! Liked that it said dowry! Slipped in a couple of clothing tags I had in my stash and some scrap paper.


Here is a peek at the edge of my canvas. I just found some pretty masking tape at the store the other day and I think it works well to finish off the side of a canvas. Not to mention it's like huge washi tape!


Used some shells in keeping with the beachy challenge and some hessian twine to keep that theme going. Last but not least, a little itty bitty turtle earring can be found swimming by the flower!


I can't wait to get this in the mail to them!

Happy Thursday!