Wednesday, September 30, 2015

Yale Bots


A long time ago in a galaxy far far away...Ok so it was in Potsdam...THE MAN and I started putting these robots together from Yale locks. In fact I had written about them in a post called Getting to Know My Creative Process over a year ago.

And then we moved.

I just recently rediscovered them in the garage. THE MAN had carefully wrapped them up for moving so they were ready to rock and roll. I was totally in the mood to get working on them again!


I just hated the color....

I did however get my hands on a can of Krylon Chalky Finish white paint...and it seemed to me if I sprayed them with something similar to gesso, I'd be able to add some alcohol inks...


Which by the way worked.


Is it funny at all to you that THE MAN and I giggled the whole way through when we were gluing them together since we added real parts...Yes, they are anatomical. ;-)


I might also giggled when I added that dream big sticker under a glass & metal cap...

Fun times! These are making me happy! Happy Hump Day!

Tuesday, September 29, 2015

Wee Metal Box and Plaster Embossing: FOR LISA


Last week I was part of a blog hop over at Lori's Blog, ChouxChouxPaperArt. At one point I got asked how I embossed the top of a metal box I was giving away. Since it was a hop, I had focused more on the item than on how to make it!

I thought I'd remedy that here today!


Since it was a fine day for spray painting, I grabbed a recent spray paint find and went to town. My theory was that a chalky finish would work well for adhering plaster as well as spray painting a canvas as if it was gesso....but that is another project...My spray painting stump held both projects as they were drying..Any kind of spray paint would do as far as painting the metal box though. Just mainly something to cover the words.


Once the box is dry, grab your stencil & a credit card/scraper. Hold the stencil carefully and scrap on the plaster. Now, I don't go all fancy with my plaster. I'm just using the cheap kind you use to fill holes in the wall. ;-)

Let the plaster dry. Once it is dry, lightly sand it to take off the rough edges. Then ink up with whatever colors you want to use carefully. Just rub them right on. I happen to use Close to My Heart ink pads. I used a couple of different kinds and then smeared on gold paint with my finger and some glitter glue. The glitter glue adds a sparkle and makes the inks run a little.

Since it's plaster you have to work kinda dry or the embossed plaster will start to get sticky and it will smear.


As you can see on the flower, I glitter glued that too & also sprinkled clear glitter! In fact, it's not quite dry...but the sun was out and I took advantage of that for a photo! I added some vintage purple blooms and some ribbon!

Now, just as soon as I find a small box, this will be shipping off to Lisa so she can study it in real life. Maybe I'll send her some metal embossing tape...my second favorite kind of way to emboss metal boxes...

Linking up to the Halloween challenge over at ChouxChouxPaperArt!

Happy Tuesday!

Monday, September 28, 2015

Prepping the Cement & the Copper Leaf Fountain


Sometimes it's a treat to walk into a home improvement store and walk out with a product that fully meets your expectations! A couple of weekends back I found this new to me product and it worked amazing to seal this cement planter. 


I also "borrowed" that fancy duct tape from my kid because all projects are more fun with pretty stuff! It was really easy to mask off & apply since it was in a spray can. Now, making the fountain was a bit more difficult...involved drilling holes in rocks...

I found a metal leaf that I had not used here at the new house and spray painted it a copper color. Then we went to work finding some rocks around the house and drilling holes in them. 

A pump from the same home improvement store and a little silcone to hold all the rocks/bricks together...and I'm moving water!

I'm pretty pumped! It's not as amazing as some fountains I've seen on on-line, but it's my first! 

Happy Tuesday!


Sunday, September 27, 2015

Winner, Winner, Chicken Dinner for the ChouxChouxPaper Art Hop!


Giveaway Number 3:  Goes to comment #21:  Krista's Paper Cafe! Whooot! Message me your address (the email address is on the side of my blog) and I'll get this mailed right out to you! It might be in a nail box...since we are working on our garage and those are the boxes available to me...but I assure you it will NOT be hardware! Just a cool box with candy inside!


Giveaway Number 2:  Goes to comment #27:  Jennifer Scull: Can't wait to put this vintage wreath in the mail to you! Fun times!


Giveaway Number 1:  Goes to comment #17:  KT Fit Kitty! This little file folder is shipping out to you in a light box! Another box I grabbed from redoing our garage!

And last but not least! I have a little surprise heading out to Lisa over at BZ Scrapper. She asked how I added the raised flower texture to the metal box I made and I thought I'd make her a little box & write up a tutorial next week! 

I'd like to thank Blog Hop Owner, Lori at ChouxChouxPaperArt for this terrific HOP! I'll be linking my little present for Lisa up to her Halloween challenge!

Happy Sunday! 

Wednesday, September 23, 2015

Of Mice, Men, and Wood Boring Bees


Today is the first day of Fall in my neck of the woods. As eagerly anticipated that summer was, I'm ready to slide back into the routine. We of course have started another project. We are in the process of ripping some of the sheet rock & insulation out of the garage. Now, this is a bit counter intuitive. Usually you'd want to have something insulated! However, the mice have taken up residence and the garage did not have any ventilation so also had a funk about it. Funk removal has commenced because we like to hang out in the garage. (We have projects that need spray painting and winter is coming!)

We have a pile of rough cut wood that we'll be using as siding. Can you see it there just inside the door? THE MAN bought it from an Amish guy who sawed it up for him special.

I think changing it up to wood will add to the whole cottage look of the place. All the metal siding will be recycled and old windows donated to the ReSTore, so it's all good. The wood boring bees and the mice are quite disappointed. One wall at a time we are destroying their condo! The morning he took the insulation & siding off the first wall there was a passle of them with little picket signs squeaking HELL NO WE WON'T GO. They made for the hills after a hawk showed up.


We are using the board & batten method. Those are just the boards. Later, THE MAN will nail thin strips up between them to cover the crack. Come spring the whole garage will get stained.

Wish him luck...he's moving on to the front this weekend!

Tuesday, September 22, 2015

Day 3: Metal Washi Treat Box Giveaway for the ChouxChouxPaper Art Halloween Party!

Hey there! So Happy to have you back again for the ChouxChouxPaper Art Halloween Party Blog Hop Day 3!


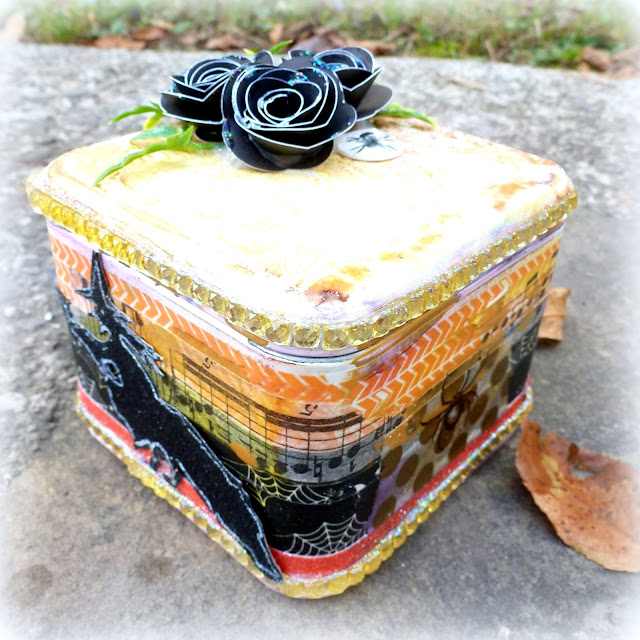
Check out this upcycled metal watch box that has been transformed into a glittery Halloweenie treat box! Sporting a sparkly witch on the side and some rolled roses on the top...


There are also plenty of other giveaways & inspiration on the blogs below:

And at the sponsors of the HOP:


Just leave me a comment and I'll pick a random winner for my box!

For each comment you leave on each blog, your name is put "in a hat" and you can be chosen randomly by the Blog Hop Owner, Lori at ChouxChouxPaperArt for her prizes! Also, she is having a Halloween Challenge! You can link up your projects until Oct. 3 and a winner will be picked randomly!

Happy Hopping and Happy Tuesday!

Monday, September 21, 2015

Day 2: Vintage Paper Wreath Giveaway for the ChouxChouxPaper Art Halloween Party!

Hey there! So Happy to have you back again for the ChouxChouxPaper Art Halloween Party Blog Hop Day 2!

I've got this hand made vintage book paper wreath up for grabs today! I have instructions on my blog if you are interested in making one yourself! Of course it's easier to just leave me a comment here to win this one!

There are also plenty of other giveaways & inspiration on the blogs below:


And at the sponsors of the HOP:


A little close up of the glitter rolled roses! So pretty with a pearl in the center! And you can just see a few of the book page images peeking out!

Just leave me a comment and I'll pick a random winner!

For each comment you leave on each blog, your name is put "in a hat" and you can be chosen randomly by the Blog Hop Owner, Lori at ChouxChouxPaperArt for her prizes! Also, she is having a Halloween Challenge! You can link up your projects until Oct. 3 and a winner will be picked randomly!

Happy Hopping and Happy Monday!


Sunday, September 20, 2015

Day 1: File Folder Box Giveaway for THE CUTTING CAFE and the ChouxChouxPaper Art Halloween Party & Link Up!

Hey there! So Happy to have you here for the ChouxChouxPaper Art Halloween Party Blog Hop Day 1! I am super excited to show you my first project!


Regina over at THE CUTTING CAFE (and one of the sponsors of the hop) created the coolest file! It's a file folder box and is super easy to make. It's great for holding cards or envelopes, but I bet it would look great filled with some treats and gifted to someone! (Maybe you?!!)


Every single side is decorated even the back! Love that pretty washi, those crystal knob feet, and that chandelier bling!


The other side has those awesome black rolled roses and a pretty little sparkly bat!

This will come treat filled for the lucky winner! Comment here and I will randomly draw a winner. Winners will be announced on Sunday, Sept. 27th.

There are also plenty of other giveaways & inspiration on the blogs below:


And at the sponsors of the HOP:


For each comment you leave on each blog, your name is put "in a hat" and you can be chosen randomly by the Blog Hop Owner, Lori at ChouxChouxPaperArt for her prizes! It's a MEGA Halloween Party Prize full of goodies and it includes a $15.00 gift certificate to Lawn Fawn! You will for sure want to leave her comment. ;-)

Also, she is having a Halloween Challenge! You can link up your projects until Oct. 3 and a winner will be picked randomly!

Happy Hopping and Happy Sunday!

Friday, September 18, 2015

You are Invited.....

To stop back by my blog on Sunday for my first giveaway!


I am participating in a super Halloweenie Blog Hop and I can't wait to show you what I made! Some little sneak peeks! This party is being hosted by Lori at ChouxChouxPaperArt who will have fun projects, videos, and prizes!

Thursday, September 17, 2015

Claw Queen: Atlantic City Layout


While we were in Atlantic City, the boys rode some go-carts while Lexi and I messed around in the arcade.

Turns out my oldest is QUITE good at the Claw Game. She won this pup in about five minutes of playing. Not sure how she does it, 'cause I never win those games...She was pretty pleased so I had to make a page of her fun!


I am currently having fun with rolled roses. And of course that plastic guitar was in a drink at Hard Rock. We ate lunch there the same day Lexi won that stuffed animal. Always fun tucking in "real stuff" from the trip!


I have really been into the washi tape lately. Used quite a bit of it on my layout. Some gold paint too to grunge it up a little.


I think this is the last of the pages from our recent trip there. I have been working on some Halloween stuff for something that is up & coming.

More about that tomorrow!

Tuesday, September 15, 2015

Atlantic City Layout

Ahhahghghghg! The part that is great about scrapbooking holiday photos is remembering the holiday unless of course it was the last trip of the summer and summer has past...

Sigh!

Give me another holiday stat, stomps foot!

yeah, that didn't work!


The best part about making this page was fussy cutting that huge title from that the bill board photo I took while walking along the board walk. Super fun! Well, also super fun was fitting four photos on this layout!


And a boat load of journaling!


Oh for a frozen custard! So yum!

Hope your Tuesday is full of sunshine and perhaps even a treat!

Monday, September 14, 2015

Wings, Roots, and Bivouac


I grew up in the shadow of Griffis Air Base. A bunch of kids that went to my school did. There were the Hamricks up on Sulpher Springs, Nick and his brother down on lower Podunk, and THE MAN of course just one road over. Most of us had parents who either worked at Griffis or were stationed at the base. Seeing planes in the sky were a regular occurrence. My Dad and my Grandpa Ham worked on the base too. I vaguely remember kids talking about being in Civil Air Patrol on the bus.

Turns out THE MAN was in it with his buddy Nick. I heard many stories over the years about the things he learned. We had no idea it still even existed, but when we were at the Rochester Air Show there was a booth  and a bunch of kids running around in BDUs (Battle Dress Uniform).

Luke was excited to learn we had an active unit 10 minutes away from the house. He and THE MAN spent hours recently obsessing about what he was going to pack for his first overnight. They made water proof matches, put together a first aid kit, and spent two hours packing.

I felt so helpless with all the preparations. They were in their own little club speaking their own language. Heck even the name of the camp out was foreign to me. Bivouac.  I'm willing to learn though. Heck the other day I googled Miliary Roll and watched a Youtube video on how to roll BDU sleeves. Next thing you know I will have the proper starch methods down for a cover (aka as a hat!).

I am pretty sure that Airman Pratt is well on his way to do great things...The other day he had his first flight from Corning to Penn Yan. Now if only he wouldn't fly away quite so fast....


Friday, September 11, 2015

Just Today Layout: At Camp


oh yummy paper! Made me happy to fussy cut it a little to give a nice big wave on my page! Got a second page out of it too, but that one you'll see later. ;-)

I like to take a photo of our "Camp" now and again. This particular photo was taken at the Atlantic Blueberry Campground.


Just a few little accordion blooms...a white felt bow and gold letters...super fun!


Used some glitter glue to outline the waves...not sure you can see it....but it's sparkly!

Heading off into the weekend now, got a busy one planned!

Thursday, September 10, 2015

Vintage Book Page Wreath for LESSology & Debbie


Our challenge here at LESSology this month is to:  Incorporate a book in your project. You can decorate a book or make a book. I chose to decorate a book, but one without the cover...and all spread out like a pretty little wreath! 


I love book pages and I've done a number of projects with them. I love them best when they are old and slightly tattered. I have been HOARDING this book for a couple of years now. It has pictures in it and the stories are pretty lame (I think it was for little girls working on their reading or something) so I didn't feel too badly about tearing into it.) I am saving the cover for another project (again with the hoarding!)


I liked having some of the images peek out of the edges of the folded pages. Really loved how those rolled roses added to the vintage flair! And how do you like that can lid? I added an image and some clear epoxy along with some liquid pearls. 


It's pretty simple to fold these to make your own. You start with cutting the book page square and then rolling them. I then pressed them flat and used a staple to secure them. Just make sure you fold them all the same way. 


I used mini staples to hold them together. I then stapled all the pages together in a flower shape.

I made a second layer of smaller pages (just cut them slightly smaller, but in a square) to finish out the wreath.


I sprayed some gold spray paint on the edges & slightly splattered the black doily. Finished off each corner with some metal pieces & chunky glitter.  This wreath is headed to my friend Debbie who had us over recently for a crafternoon. She has all kinds of vintage in her house and I hope she enjoys it!