Monday, April 4, 2016
Memoradum Monday: Barbie Welders & Reduction Glass
I brought a pile of things over to the ReStore last week as they were hanging out at Massi's Spring Fling on Saturday. I hadn't ever gone before but it was chock full of amazing crafters. Really yummy stuff. Massi's has awesome plants, but as we're not quite into plant buying season, they host Spring Fling which is mainly a craftshow, but a lot of not for profits also attended like the local animal rescues. It was great being under cover in the green houeses because it rained a couple of times!
I tried to stick with things I made that that came from the ReStore. They sell vintage hankies now and again and those crystal ends on these angels were water facet handles I found there the other day. I was all happy with the light bulb heads...I left those clear and I think they look really cool! I raided the light bulbs from THE MAN's stash, but they sell those as well. Hopefully they sold at least a couple of things, but I was way too busy looking around!
I hung out with gaffer Chrissy Lapham for a few minutes who had the most awesome vases. We had a great talk about how she got a gold shimmer in her blown glass vase. She used a reduction glass which was red but then used a blow torch to pull out the gold color. She teaches over at The Studio where I have been volunteering. She suggested I take a class. WOULD LOVE TO!
I also met Barbie the Welder. I would love to weld too! Both of these people do not know that I currently have a hot glue burn ON MY FOOT. Yeah. I would love to work with hot glass or metal....but it might also be best left to the professionals. Oh heck, who am I kidding...I am totally doing a glass class soon...and THE MAN can teach me how to weld...
On the subject of glass blowing...I'll be back tomorrow to show you something I kinda sorta made. Without giving it away, I will tell you that I learned that glass blowing takes more lung capacity than I previously thought!
Waving hi over at Sian who blogs at From High in the Sky. She is our lovely host for Memorandum Monday.
Happy Monday!
Friday, April 1, 2016
Pluck & Not Luck Layout for Another Freaking Scrappy
I haven't done a scrapbook page in so long that I got confused and did an Art journal one on 12 by 12 paper! No, I am just kidding, but a lot of this is what is in my brain at the present moment. Yes, I think about citrus all the time....
Don't try to twist your neck to read the journaling...I've got it here:
About six months ago a guy (baby engineer) I worked with was complaining about how slow the industry we were in had gotten....He asked me earnestly yet inappropriately "what are YOU going to do-none of your business seemed to be a jerky response however I thought to myself-what won't I do? What if I fly and thrive and don't look back....besides I'm most worried about the clothes...
Let me explain. I have found in the variety of jobs I've had over the years that most people pigeon hole you into what you have done most recently. At least with a resume, they look at what you have in the past, however with mine you have to skip 13 plus years to get to something before the gas industry which is just about gone in this area. So baby engineers may think all they have to offer the world is their stamp. No so. You might have to start at the very beginning again, but if you can swing it...it's doable. I am onto my third career at this point, which I hear is pretty typical for this day and age.
I have found as I have been job hunting the past couple of months that the resume really doesn't mean jack shit. I got the interview for the job I'm moving onto because I knew the guy. Normally my resume would have been tossed into a pile as over qualified and I'd never have gotten the call. People I haven't talked to in over a decade have spotted my resume out and about and have reached out to me. It's not about the stamp, it's about what kind of worker you are. If you are an over promising under delivering slather, it doesn't matter what you have on that piece of paper. If you are washing out garbage cans after fraternity parties (done that) or saving the world...& being paid to take care of whatever it is, you need to do your very best.
Anyhow, onto the image of the orange that is a tomato. Lexi made that image last year at some point in Photoshop for an art class. Believe it or not, it didn't get a great grade, I however loved it. Which is of course why I have been hoarding it for just the right page. I think it fits my point. What you see on the outside isn't always what is on the inside of a person. The baby engineer only saw me as a Project Manager. What am I really? I'm a good worker. Adaptable. Good at getting shit done.
Which brings me around to the pink Michael Jackson coat letter I wrote my Grandma Skip when I was little. This new gig involves dressing up. I have worn jeans and stomping boots for years. Yeah, I'm not really worried about doing a good job at my new job. I know I will. I am worried I will be bad at dressing up. However, let's go back to that I'm adaptable thing and give me the benefit of the doubt. I think I'll be just fine. I will however skip wearing a pink Michael Jackson coat. I think that ship has sailed out of the fashion industry, thankfully!
This page was made for Another Freaking Scrappy. Anne wanted us to use Luck in our title. While I think some parts of job hunting might involve some luck, there is a much larger percentage of being plucky and having the courage to keep turning over rocks until you find the right thing.
Anyhow, jumping off my soap box! Although I am excited to see your pages if you play along with our challenge! That would be top notch!
Wednesday, March 30, 2016
UFO Wrapped Up: Leather Hankie Box Upcycled
Usually at any given time I have a couple of UFOs hanging out in my studio with me. Unfinished objects who mock me from their dusty corners. Thankfully I am really good at tuning out their cries, because sometimes I just don't have a good idea on how to wrap something up. As much as I wanted to finish this little leather box, I was having trouble with how to decorate it.
This is what I started with. I was pretty sure that napkin that Yvonne Yam passed my way would look great with that wood piece that I have been hoarding. After trying a few things with the wood piece, it wasn't working so the box sat covered with gesso & the napkin for several months waiting for inspiration.
Finally decided that I needed to decorate the sides with washi tape, glue on the feet, and see what it looked like at that point.
I opted to use a little spray paint at that point to dull down the shiny tape and cover the inside. Worked a treat! Then I was able to wrap up the top with some roses that I upcycled from the Restore.
Here is a close up of the top. You can see some of the napkin peeking out from under the roses. I added that metal frame with the vintage image for a focal point.
Now it's done and no longer mocking me, it's quite a relief!
Happy Hump Day!
Tuesday, March 29, 2016
Recycled Cardboard Fairy Spool Shrooms
I love Pinterest! I must admit I saw three or four pins on Pinterest recently for schrooms and was inspired to create these. How I saw just the right pin when I had a pile of cardboard spools to use up is beyond me. I will also admit I got so into making these that I accidentally forgot a dentist appointment!
The ones I saw on-line did not have a little fairy...but I knew mine needed one! Found the coolest fairy and printed her out on photo paper. A little fussy cutting & hot glue...she was sitting pretty on my schroom! The stems are washi tape and some twine.
The bottom of the spool fit perfectly in this glass vintage candy dish. I snagged the dish at the Restore because it had a plated silver base that I thought looked cool. I wasn't sure what I was going to use it for at the time.
I had so much fun I made two more! I plan on donating them to a sale that the ReStore is having this weekend.
Happy Tuesday or should I say Shroom Day!
Monday, March 28, 2016
Memorandum Monday: Project Scrapenberg Update Goin' Digital
Oh goodness gracious. We ate the ears off the chocolate bunny, had hot boneless chicken wings and brownies for Easter supper and now we're recovering from some DIY. We started a new project here at Pratt Inc. but it's still in the yucky gross phase, so I'll skip telling you about that until it's sexier.
I will tell you all about my photo session with my first scrapbook ever. Yes lovely little baby photos of Lexi...that were falling off the page. Turns out glue sticks aren't all that permanent. I learned from taking each page out for a photograph that springing for the good glue is worth it. It was not fun glueing photos back on the page!
Regardless, the whole book from 2000-2002 has been saved digitally and I used the contraption that THE MAN built to streamline the photo taking. There was still quite a bit of cropping, but honestly that is somewhat mindless...
Turns out that using it on it's side when it's sunny means that I can get good photos without much glare. I enjoyed the stroll down memory lane too!
I also figured out a really good use for those cardboard spools that I blogged about last week...oh my. So much fun that I even gave myself a hot glue burn! I'll show you what I came up with tomorrow. I was hoping that my project would fit inside those choches, but I haven't quite figured that out as of yet.
Anyhow, happiest of Mondays! Waving over to Sian with a band-aide on my thumb...silly hot glue! She hosts us for Memorandum Monday and blogs about her adventures with sock knitting, Mom-ing, and scrapping!
I will tell you all about my photo session with my first scrapbook ever. Yes lovely little baby photos of Lexi...that were falling off the page. Turns out glue sticks aren't all that permanent. I learned from taking each page out for a photograph that springing for the good glue is worth it. It was not fun glueing photos back on the page!
Regardless, the whole book from 2000-2002 has been saved digitally and I used the contraption that THE MAN built to streamline the photo taking. There was still quite a bit of cropping, but honestly that is somewhat mindless...
Turns out that using it on it's side when it's sunny means that I can get good photos without much glare. I enjoyed the stroll down memory lane too!
I also figured out a really good use for those cardboard spools that I blogged about last week...oh my. So much fun that I even gave myself a hot glue burn! I'll show you what I came up with tomorrow. I was hoping that my project would fit inside those choches, but I haven't quite figured that out as of yet.
Anyhow, happiest of Mondays! Waving over to Sian with a band-aide on my thumb...silly hot glue! She hosts us for Memorandum Monday and blogs about her adventures with sock knitting, Mom-ing, and scrapping!
Sunday, March 27, 2016
Drinking and Arting: Altered Glass Egg & Bunny
Happiest of Easters from New York all the way to your neck of the woods. We are shovel deep in another project here at Pratt Inc. but I thought I'd hop over here and show you my altered glass egg. Perhaps if you are nibbling the ear off your chocolate rabbit you can take a bit of a break to do some spray painting...
My glass egg got it's photo taken with my adult beverage before I started hot gluing. It's suspicious to me that the colors I used are very similar to my Hard Soda.....inspiration is a funny thing...
In fact, I even used the little bottle cap in a bed of moss for my vintage bunny. Good thing I had it handy. Can you spot the metal facet handle that is under the cap? It was a gross green, but I hit it with a little gold spray paint.
I added a lot of flowers that I purchased at the Restore. In fact, the rabbit, glass egg, and brass candle stick all came from there. I used a bit of epoxy to glue them together. That came from the hardware store!
Here is a bit of a before picture before the spray paint. Blogged about my score here.
One last photo of my glass egg. Really loving the colors of the base. I added a smidgen of blue alcohol ink after the spray paint was dry to match my flowers!
Now I want you to know that my bunny is the twin to another bunny who was part of a project blogged about today way over in Arizona. Miss Lisa created the coolest little choche over at Life of a BZ Scrapper. I snagged a photo of her creation, but really you need to pop over and check it out! Her deer has rainbow sparkles!!!! AND BEADS!! Omg....Check it out!!!
Fun times! I'm back tomorrow with a post for Memorandum Monday. Lots going on here at Pratt Inc!
I'm looking forward to telling you all about it!
Thursday, March 24, 2016
Easter Bonnet Goose Egg
Someone round these parts cuts goose eggs in half, adds a shit ton of fancy smancy and then lines the whole thing with velvet. I do not think I have the capacity for such shenanigans. I can however respect the amount of time and bling these eggs take. So, when I spot one at the ReStore, it's mine. It's purely out of respect of course and also because hello shiny bling trinket box with gold feet come to me now.
Lucky for me I found a second one about six months back and I've been sitting on it waiting for Easter. The first one (purple pink on the right) I made ages and ages ago. It was in much worse shape than the latest one I found. The white one had someone's dog on the top that I needed to cover up. Turns out a little bit of gesso carefully added with a paint brush fixed that up quick.
I added a little bit of ink & some shimmer paint to get a water color look and then pulled out the glue gun. Yes, I found a wee mannequin for my pretty little hand knitted Easter bonnet. The bonnet had been in my stash since I went through doll house stuff I had when I was a kid.
My Mom made it when I was a teen and we used tiny blue glass beads and pink seed beads for flowers. The little doll's head was from the Restore and was in the same lot as the Bitchy Baby Fairy head.
Totally digging those pearls & the gold and pink ribbon. I am not sure my hand would have been steady enough to get those glued in that straight so I really must thank the artist before me for giving me something top notch to work from!
Happiest of Thursdays!
Linking this up to Choux Choux Paper Art's Easter challenge!
Wednesday, March 23, 2016
Upcycled Shoe Horn Horse Angel
How could one possibly pass up a shoe horn with a horse head at the Restore? I thought you'd see my point. So, let's not get into how long this horse was in my stash. Ages and ages and I just happened across him while looking for something else...and I was working on angels at the time...and I thought, why not?
I used one of those spindles I was talking about yesterday and a fancy knob for the bottom. I pretty much used the same process, just substituted the shoe horn for fancy knob. If you didn't see my tutorial, take a look It took me ages and ages to write the whole thing up, but anything for my peeps! I'd love it if you pinned it or shared it for me. Check it out, I have this fancy smancy tool bar now on the left hand side of my blog for all kinds of sharing.
This horse angel got an extra doily skirt because I left the spindle longer. Also, the hankie has pansies on it. I thought they fit what a horse might like. This might be one of my crazier projects, up there with upcycled lock robots and a crazy bitchy baby fairy with wheels.
I added a vintage key, feather dangle, and a velvet flower to this angel. I am loving all the different textures & sparkles!
Stop back tomorrow. I've been hot gluing anything and everything...and an egg might be involved!
Happy Hump Day!
Tuesday, March 22, 2016
Upcycled Vintage Hankie Spindle Angel Tutorial: Jeff Goins 7 Day Blog Like A Pro Challenge
The first step of any project is to assemble your ingredients. In the case of these spindles, I had been hoarding them for ages in my closet, so it was more a matter of seeing their potential. You could really use just a simple 1/4 dowel or even a smooth stick to make these angels. It's just a matter of finding something to use as a body. You also need to be on the hunt for vintage hankies. Find a couple that layer well together. Add in a cool knob and you are ready to rock and roll.
Ingredients:
- Spindle
- Wings (mine are cut using a Sillhouette and a printable download)
- Fancy Knob
- Smaller Knob
- Spray Paint
- Flowers
- Vintage Doily or two
- Epoxy
- Hot Glue
- Dikes
- Gold Pipecleaners
- Vintage item or stamped image for Angel to hold
- Ribbon or dyed seam binding
- Jump rings for hands or fancy bead
Step One:
I painted my spindles with a bit of Rust-oleum Hammered Ivory and added some gold splatters. They were originally green and battered, so it kept the patina but added some shimmer.
- I then drilled holes in the top of the spindle and also in the bottom. I used a drill bit that was slightly larger than the screw.
- My last step was to Epoxy in the top knob and the bottom. As you can see from the photo, my white knobs on the bottom were not painted until after. You could do it that way or paint it ahead of time. Or leave them as-is.
Step Two:
- Iron vintage doilies together. Use the best triangle of the hankies that work the best together. For instance, I wanted to keep the corner wtih this lovely embroidered flower. Spray adhesive will work to hold them together or starch, if needed.
- Then carefully cut the doilies diagonally. Iron the top piece over carefully. The left over pieces might be useful too so keep them handy.
- Twist on the pipecleaners for arms. Tack the back of the pipecleaner on the spindle if it's not staying.
- Sew the doilies together using a very loose stitch so you can pull one end of the thread carefully to bunch together the fabric.This will make the part by the face look finished.
Step Three:
- Hot glue the cinched up hankie to the front of the angel by the knob.
- Flip over and hot glue the ends of the triangle down so the arms are sticking out.
- In the front of the angel, twist the pipecleaner together so you can see the arms.
Step Four:
- Glue Wings on the back of angel. I positioned mine nearer to the shoulders. Spread out a little. Don't worry about being too messy with the hot glue, you will finish off the back with a hanger.
- Add vintage seam binding or ribbon in a bow near Angel's face.
- Add flowers & item for angel to hold.
Step Five:
- Twist smaller piece of pipecleaner as a hanger and hot glue under a oval decorative piece of paper
- Fluff & tweak, and hang!
- If giving as a gift, sign that ovel and date with year. That way it's a keepsake.
Add vintage jewelry and charms for extra bling. This one got a lovely sparkly red & turquiose piece and a bird!
Thanks for reading my tutorial. I'm participating in day four of Blog Like a Pro Challenge run by Jeff Goins. Today is be generous. I'm giving away my vintage hankie tutorial. Would you be so kind to share it with anyone you know that might be into vintage, lace, upcycling and angels? Thanks so much!
Monday, March 21, 2016
Memorandum Monday: Low, Medium, and High
Last week found me CMOGing over at MYOG. Here in the Twin Tiers, that means I volunteered at the Corning Museum of Glass over at Make Your Own Glass. Across from the museum itself is something called The Studio and you can sign up to make glass wind chimes, flame worked beads, or blown glass ornaments. Since I'm having trouble not twitching due to not working, I figured I'd give them some of my time. Incidentally this photo is looking away from the museum and across the river at Little Joe and HQ for Corning Inc. Spring is clearly on it's way and I thought it was pretty.
It's pretty low key work at MYOG. One day I cut leather into pieces for pendants and was rewarded with a bunch of cardboard spools. What I'm going to do with them is besides the point. They are cool and needed to not be trash. I also had an interesting conversation with someone regarding epoxy and really got good at jump hooks. A lot of the help they need at the Studio is prepping things for projects. I guess the more important thing I learned was that it's easier to wait while you are busy even if it's a bit mind numbing.
I also committed to a Jeff Goins Blog Like a Pro: 7 Day Challenge. If I didn't already have a blog and hadn't heard of at least half of what he was talking about I probably would have ended up in a corner rocking. It's pretty intense. For the mere mortals taking the class, a less stressful idea would be a 7 Week Challenge, but that is just me. Seemed like a lot of peeps were getting freaked out.
Some of things he was talking about were cool though. Recently I signed up for Medium which is yet again another platform to share your work. He asked us to post one of our blog posts to Medium. If you have already written the blog post, it's as simple as importing. I used my Marie Kondo piece.
At one point last week I had to get dressed up. Nobody in my house believed that I was capable of wearing anything but jeans and stomping boots so I had to take a selfie in the only room in the house with a full length mirror and enough light. Welcome to one hot mama and Lexi's unmade bed. Those shoes by the way are totally going back to the store. My toes still hurt!
Wish'd I could have taken a photo of me waving! It's that time on a Monday where you give Miss Sian over at High in the Sky a quick wave! Hoping she made good progress on her socks and I am sure she would totally be down with comfortable non-toe pinching shoes.
Saturday, March 19, 2016
Marie Kondo Skipped a Chapter: Jeff Goins 7 Day Blog Like A Pro Challenge
Lately I've been reading the Marie Kondo book called the Life-Changing Magic of Tidying Up. It's all over the interwebs so I am guessing you've at least heard of it. If not, take a gander over at Amazon. It's one of those small books that has now sold trillions of copies and a shit ton of blog posts have been written dedicated to the methods she describes with various free printables and top ten lists. At this point, it might have morphed into the realm of being gimmicky but purely because well, free printables? Seriously, enough already.
I started reading it as I was interested in her concept of actual items sparking joy. As for tidying, I must have channelled my inner Kondo years past as I am pretty good about dropping unused Pratt goods to the ReStore. A friend once wandered through our basement and asked where all my stuff was. I'm not a die hard tidying freak, but I do like my things where I can find them. Less things are much better in my book. Add in pretty containers I've made, and I'm all over it like white on snow.
I do believe though that Marie skipped a chapter. She forgot to talk about us. Those creatives who need stuff to create other stuff. We can be hoarders. We save that special paper for well, special. We have a closet or two full of little boxes, cans, jars, and odds & ends that really do not spark joy. They are waiting for their rebirth at our capable hands. Scrapbook kit clubs keep delivering their monthly loveliness, however we don't even take them out of their bag because we still have six months worth to use up. Seems like we might just be buying to buy? Retail therapy one scrap kit at a time.
The industry appears to feed our inner glutton. Why shouldn't it? Every six months they have another CHA Show and we are fed tantalizing little sneak peeks into what we will want to buy next. How many more sets of stamps must we buy that never experience what it's like to be inked up. What about that quilling tool you just had to have, yet have never used to twirl a flower or paper into a pretty design even just once. I mean you used it last week to poke something but....don't think that counts.
If we can ignore CHA , we then have those Michaels flyers landing in our inbox or mailbox showing us their version of what is hot in the crafting worlds. One trip in for simple glue may result in serious loss of willpower and next thing you know you are wheeling out one of those huge suitcases on wheels where you can store your goodies so it's portable for those weekend Crop Til You Drops where they sell still more stuff. Just blow off the dust first before you go so you still look like a serious crafter.
Don't get me wrong. Please don't take away my craft store or CHA Show full of new ideas and designs. Let's just be real here. If you are accumulating more than you are using, you might have a problem. If your stash is taking over your craft room? It might be time to do some serious Marie Kondo (skip the printables please) on the excess paper. Too many craft magazines? Turn to page 89 and follow her directions.
I think we need to focus on purchases that are wise & clearly that spark joy. That way we can focus on what's important:
This was written for Jeff Goins/Day Three/Pick A Fight Blog Like a Pro Challenge. If you are interested to see what we're up to, take a peek at his post. I'm pretty behind, you were supposed to do these daily, but I refuse to be bullied by the interwebs. Or craftstores...or big time bloggers. ;-)
I started reading it as I was interested in her concept of actual items sparking joy. As for tidying, I must have channelled my inner Kondo years past as I am pretty good about dropping unused Pratt goods to the ReStore. A friend once wandered through our basement and asked where all my stuff was. I'm not a die hard tidying freak, but I do like my things where I can find them. Less things are much better in my book. Add in pretty containers I've made, and I'm all over it like white on snow.
I really love the idea of things sparking joy. In fact, my goal when I create is that it will make me happy to look at the new item or better yet, make someone's heart happy when they receive it.
The industry appears to feed our inner glutton. Why shouldn't it? Every six months they have another CHA Show and we are fed tantalizing little sneak peeks into what we will want to buy next. How many more sets of stamps must we buy that never experience what it's like to be inked up. What about that quilling tool you just had to have, yet have never used to twirl a flower or paper into a pretty design even just once. I mean you used it last week to poke something but....don't think that counts.
If we can ignore CHA , we then have those Michaels flyers landing in our inbox or mailbox showing us their version of what is hot in the crafting worlds. One trip in for simple glue may result in serious loss of willpower and next thing you know you are wheeling out one of those huge suitcases on wheels where you can store your goodies so it's portable for those weekend Crop Til You Drops where they sell still more stuff. Just blow off the dust first before you go so you still look like a serious crafter.
Don't get me wrong. Please don't take away my craft store or CHA Show full of new ideas and designs. Let's just be real here. If you are accumulating more than you are using, you might have a problem. If your stash is taking over your craft room? It might be time to do some serious Marie Kondo (skip the printables please) on the excess paper. Too many craft magazines? Turn to page 89 and follow her directions.
I think we need to focus on purchases that are wise & clearly that spark joy. That way we can focus on what's important:
Making new happy things that reflect your passion for creating.
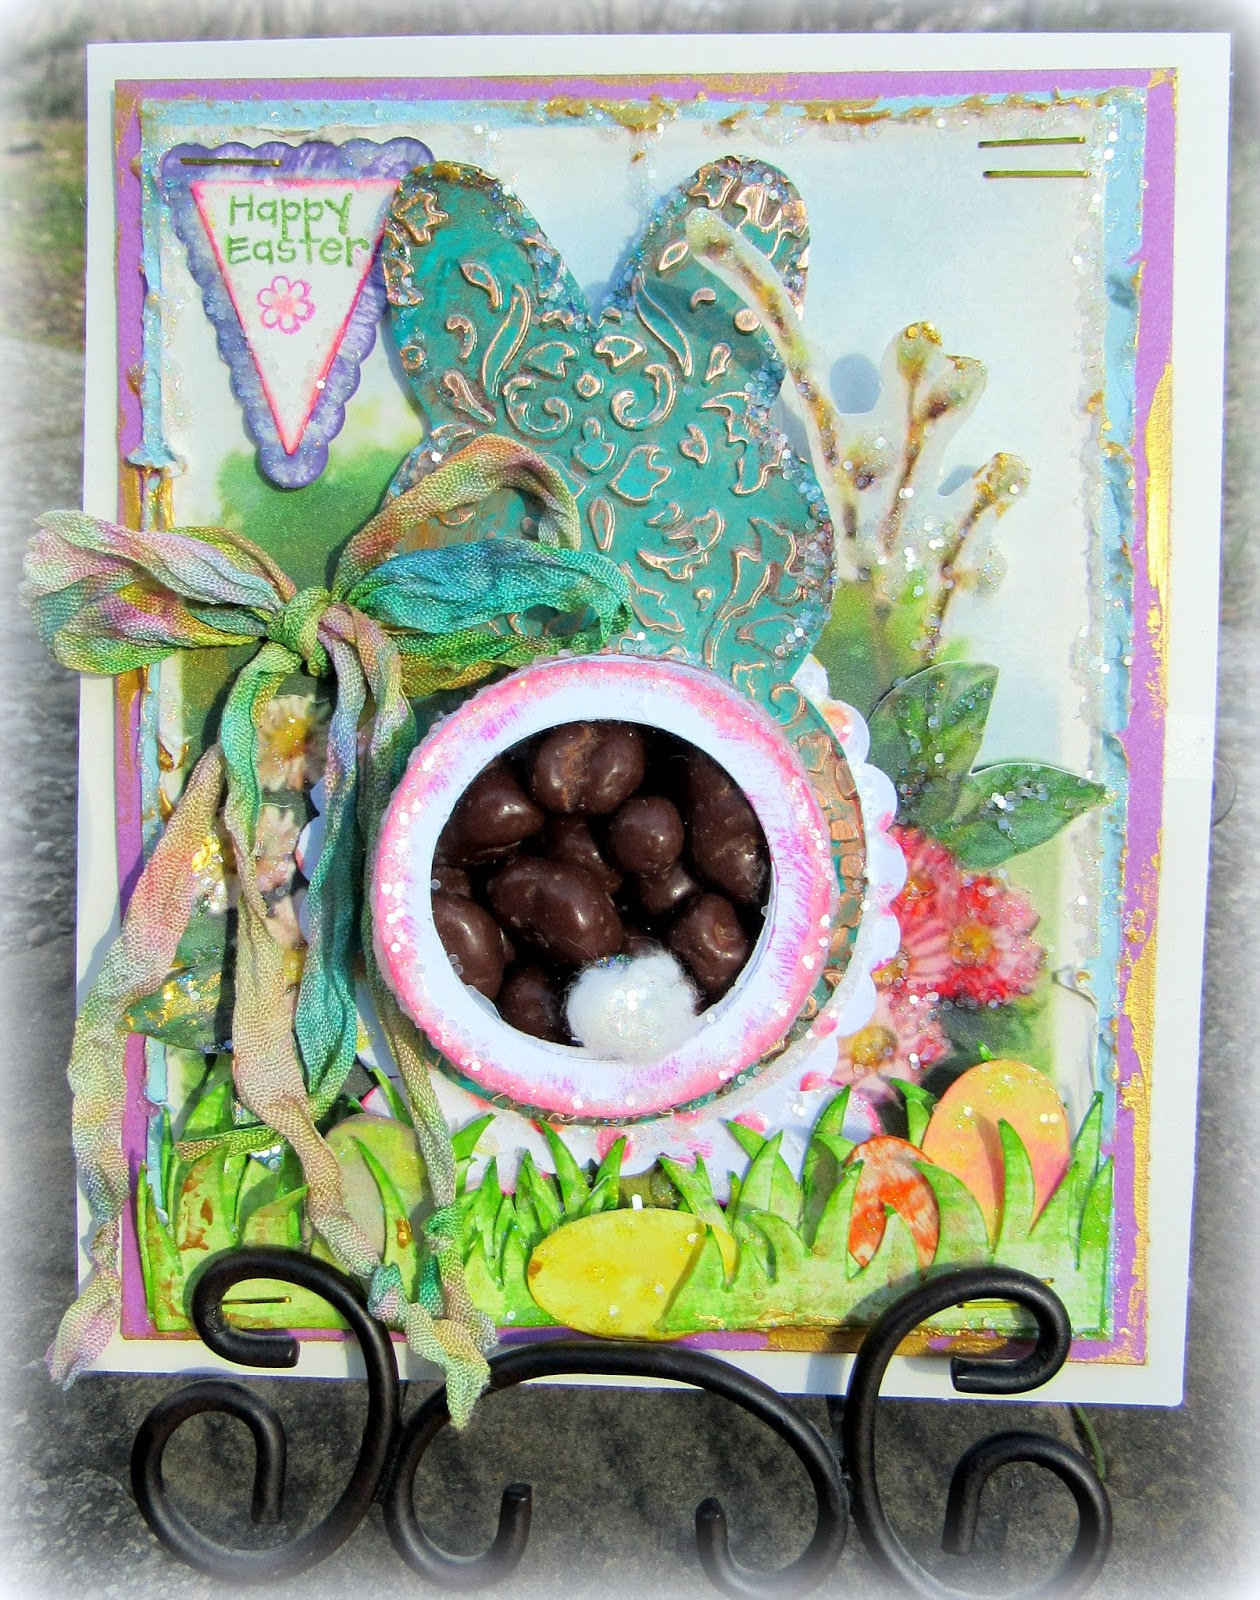
Metal Bunnies & Bunny Poo for THE CUTTING CAFE
When I was little, I had bunnies. I think if you recall, I blogged about them a bit ago at Christmas time...I tell you this so you know that I know what color poo domestic bunnies have. It's black. BUT, little wild bunnies have brown poo. Stink with me here...
I was about four and wandering around under these big pine trees that were in my Grandma Skip's front yard when I found these magical brown ovals and asked my Aunt Caryl what they were. I was disgusted when she started laughing and told me to ask Grandma Skip. Grandma Skip was a bit uptight on the whole dirt thing so she was like ugh THROW THEM AWAY RIGHT NOW THEY ARE BUNNIE TURDS. They did not look the same as my bunny's poo so I didn't know.
So, I opted to fill my treat cups here with chocolate covered raisins in honor of Grandma Skip.
Of course if you don't want your recipient to think of poo when you send them this little treat card, you can always run with the concept that the rabbit is facing forward....This cutting file is from THE CUTTING CAFE and is one of three in the Easter Treat Cup series. It comes with a cute little bunny face as well as a bunny tail and some eggs & grass.
I wanted to try some of the copper I got in sheet form recently so I hand cut the bunny from the copper, added patina, and then sanded. It's pretty here with all the glitter.
I had fun fussy cutting a vintage image, popping out the leaves, flowers, and pussy willows. Then I used three sets of grass and a variety of eggs to set the stage for the bunny. How do you like that metal rabbit? Came from the Restore...off season of course and I've been hoarding him since for Easter.
Hop on over to check out those cutting files! Lots of time left to get some cool cards made!
Subscribe to:
Posts (Atom)